Customizing DataCAD's Interface for Hi-Rez Displays
Note: This article has been updated to reflect the newly-expanded Program Preferences dialog that now includes all of these settings. Prior to DataCAD 19, you'll have to change these settings, as noted below, by editing DCADWIN.INI using a text editor such as Notepad.
Starting with Windows Vista, Microsoft introduced display scaling to improve legibility on smaller, high resolution displays. The recent introduction of tablets like the Surface Pro 4 have pushed the typical 96 ppi of legacy laptop displays to 267 ppi. This means a 16 pixel icon that used to appear about 3/16” square, will be reduced to less than 3/32” square.
Display Scaling tries to overcome this problem by resizing the display by 150% or more. This can cause DataCAD's interface to look ‘chunky.’ You can often correct this problem by enabling DataCAD’s Logical Pen Width setting. Starting with DataCAD 19, Logical Pen Width is TRUE by default. On older versions, you'll have to manually change the value.
In the [General] section of DCADWIN.INI, set the key, Logical Pen Width=TRUE.
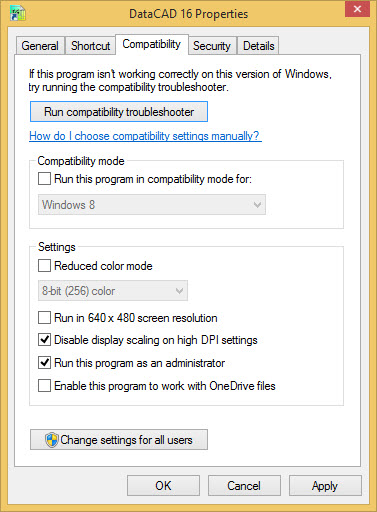
You can prevent Windows from scaling DataCAD’s interface by changing a compatibility setting.
- Right-click on your DataCAD program icon and select Properties.
- Select the Compatibility tab and check 'Disable display scaling on high DPI settings.'
 Program Shortcut Compatibility Tab
DataCAD_Shortcut_Compatibility.jpg (76.49 KiB) Viewed 38699 times
After making these changes, DataCAD’s display should look sharper because the program interface will be shown 1:1, or pixel for pixel. However, everything will also appear smaller. On a 220 ppi display, the default interface will be too small to read for most of you. You’ll want to adjust some of DataCAD’s Interface settings to improve legibility.
In DataCAD's Tools, Program Preferences, Menus tab, you can bump the font size to 12 or 14. This will increase the size of the text on your left-hand menus.
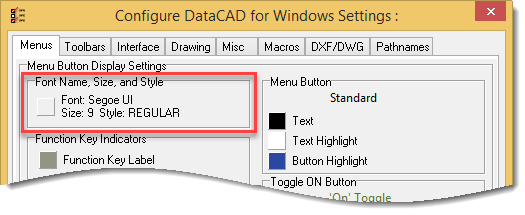 Menu Button Font Settings
Menu_Font.png (12.75 KiB) Viewed 35404 times
On the Toolbars tab, you can increase the size of toolbar icons to 24 or 32 which will make them look about the same size as you’re used to. Note: You'll have to restart DataCAD to see the larger icons.
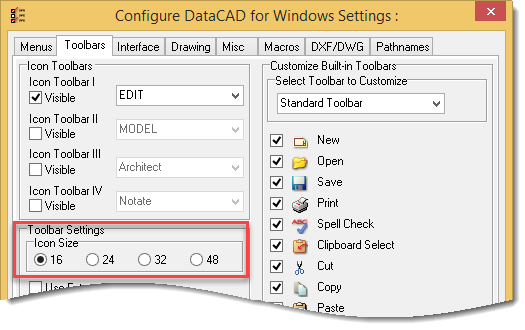 Toolbar Icon Size
Icon_Size.png (21.06 KiB) Viewed 35404 times
Some of DataCAD’s interface text such as the application title bar and pull-down menus is controlled by Windows. So you’ll need to change them using the Windows Control Panel.
 Windows Personalization: Display
Personalization_Display.jpg (112.4 KiB) Viewed 38699 times
- Right-click on your desktop and select Personalize.
- In the lower-left corner under See Also, select Display.
- On this page, you can 'Change only the text size' if 'Let me choose one scaling level for all my displays' is unchecked.
- You can individually set the text size for Title bars, Menus, Message boxes, Palette titles, Icons, and Tooltips.
- Select Menus from the drop-down list and change it from the default of 9 to 12 or 14 to match the size you set for DataCAD's left-hand menus.
- Select Apply, and after a few moments Windows will update your display.
- You should see the change in DataCAD immediately.
There are a couple other interface settings you may find useful to customize the menus to your liking.
On the Menus tab, you can increase the Menu Button Spacing. This value determines the vertical space, measured in pixels, between left-hand menu buttons. You can increase this value to 'spread out' the buttons to make better use of the available menu area.
You can increase the Menu Button width. This value determines the additional width, measured in pixels, to increase the left-hand menu width by. Setting this value to 64 should add a little more than 1/4" to the menu on your tablet's display.
You can hide the function key indicators that normally appear next to the left-hand menu buttons. In the Function Key Indicators section, check Hide Function Key Indicators to remove the F1 through S0 labels.
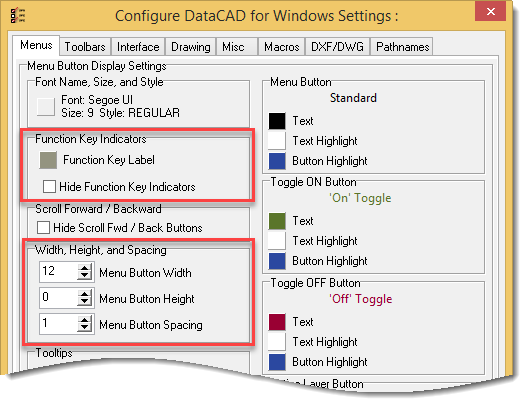 Menu Button Width
Menu_Button_Width.png (19.77 KiB) Viewed 35404 times
In the [MenuBtn] section of DCADWIN.INI you'll find the following corresponding keys which are not accessible through the program interface prior to DataCAD 19.
BTN_SPACING=1
BTN_WIDTH=0
SuppressLabels=0
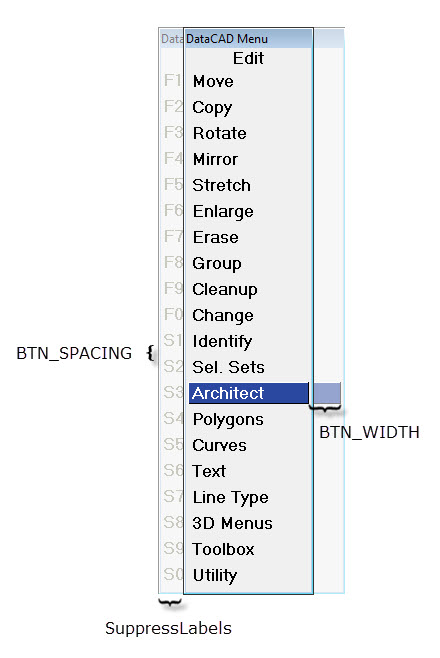 Menu Window
Menu_Window_Large.jpg (46.64 KiB) Viewed 38699 times
On the Toolbars tab, you can increase the drop-down width of status bars. Setting this value to 64 will increase the width of drop-down elements such as Wall, Door, and Window types, a little more than 1/4" on your tablet's display.
Prior to DataCAD 19, you'll need to modify the the key, DropDownWidth, in the [StatusArea] section.
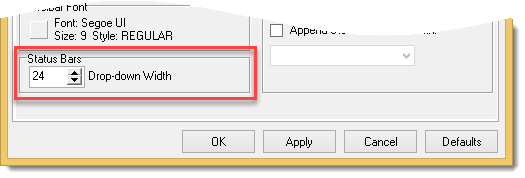 Drop-down Width
Drop-down_Width.png (5.25 KiB) Viewed 35404 times
 Viewed 38699 times") Status Panel
Status Panel
On the Interface tab, Symbol Browser Docked Width allows you to increase the docked width of the Symbol Browser. Unlike Menu Button Width and Drop-down Width however, Docked Width is the total width in pixels. You'll have to use a value above the minimum width to see any effect. So start with a value above 160, like 256.
Prior to DataCAD 19, you'll need to modify the the key, DockWidth, iIn the [SymbolBrowser] section of DCADWIN.INI.
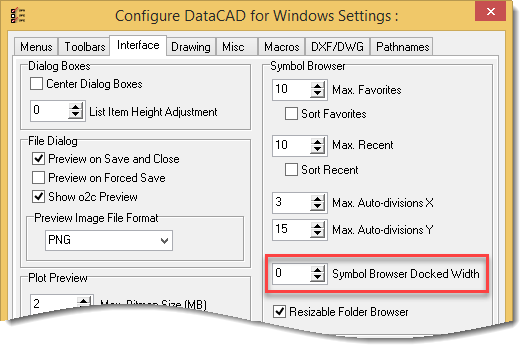 Symbol Browser Docked Width
SB Docked Width.png (15.55 KiB) Viewed 35404 times
The last thing you’ll want to do is calibrate DataCAD’s display aspect ratio so that squares and circles appear uniformly square and round. This will also ‘correct’ your display so that a display scale of 1/4" = 1’ - 0" will be true. In other words, you could use an architect’s scale to measure the drawing on your display.
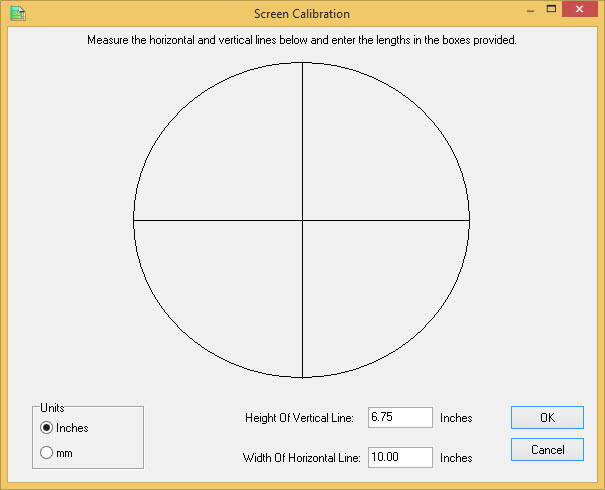 Screen Calibration
Screen Calibration.jpg (42.91 KiB) Viewed 38699 times
Screen Calibration
- Choose “Program Preferences” from the “Tools” pull-down, and then choose the “Drawing tab.”
- Click on the “Screen Calibration” button. DataCAD displays the test pattern.
- Use a ruler to measure the length of each line on the screen, and then type their values in the fields below. Values may be entered using either decimal inches or millimeters.
Note: Make sure to enter the decimal value for each line, without the label; for example 9-1/4” would be 9.25.
- After you have entered both values, click OK on the “Screen Calibration” window, then OK again on the “Configure DataCAD for Windows” dialog. You have completed the process of calibrating your screen.
The best way to test the calibration is to draw a circle inside a square using coordinate input. Measure the length of the lines as they appear on the screen to confirm accuracy of the screen calibration, and check the display of the circle to ensure that it does not look like an ellipse. It should be noted that the shape of the lines and circle in the test pattern does not change after the screen is calibrated. Calibration only calibrates the drawing area.
Note: This article has been updated to reflect the newly-expanded Program Preferences dialog that now includes all of these settings. Prior to DataCAD 19, you'll have to change these settings, as noted below, by editing DCADWIN.INI using a text editor such as Notepad.
Starting with Windows Vista, Microsoft introduced display scaling to improve legibility on smaller, high resolution displays. The recent introduction of tablets like the Surface Pro 4 have pushed the typical 96 ppi of legacy laptop displays to 267 ppi. This means a 16 pixel icon that used to appear about 3/16” square, will be reduced to less than 3/32” square.
Display Scaling tries to overcome this problem by resizing the display by 150% or more. This can cause DataCAD's interface to look ‘chunky.’ You can often correct this problem by enabling DataCAD’s Logical Pen Width setting. Starting with DataCAD 19, Logical Pen Width is TRUE by default. On older versions, you'll have to manually change the value.
In the [General] section of DCADWIN.INI, set the key, Logical Pen Width=TRUE.
You can prevent Windows from scaling DataCAD’s interface by changing a compatibility setting.
- Right-click on your DataCAD program icon and select Properties.
- Select the Compatibility tab and check 'Disable display scaling on high DPI settings.'
DataCAD_Shortcut_Compatibility.jpg (76.49 KiB) Viewed 38699 times
After making these changes, DataCAD’s display should look sharper because the program interface will be shown 1:1, or pixel for pixel. However, everything will also appear smaller. On a 220 ppi display, the default interface will be too small to read for most of you. You’ll want to adjust some of DataCAD’s Interface settings to improve legibility.
In DataCAD's Tools, Program Preferences, Menus tab, you can bump the font size to 12 or 14. This will increase the size of the text on your left-hand menus.
Menu_Font.png (12.75 KiB) Viewed 35404 times
On the Toolbars tab, you can increase the size of toolbar icons to 24 or 32 which will make them look about the same size as you’re used to. Note: You'll have to restart DataCAD to see the larger icons.
Icon_Size.png (21.06 KiB) Viewed 35404 times
Some of DataCAD’s interface text such as the application title bar and pull-down menus is controlled by Windows. So you’ll need to change them using the Windows Control Panel.
Personalization_Display.jpg (112.4 KiB) Viewed 38699 times
- Right-click on your desktop and select Personalize.
- In the lower-left corner under See Also, select Display.
- On this page, you can 'Change only the text size' if 'Let me choose one scaling level for all my displays' is unchecked.
- You can individually set the text size for Title bars, Menus, Message boxes, Palette titles, Icons, and Tooltips.
- Select Menus from the drop-down list and change it from the default of 9 to 12 or 14 to match the size you set for DataCAD's left-hand menus.
- Select Apply, and after a few moments Windows will update your display.
- You should see the change in DataCAD immediately.
There are a couple other interface settings you may find useful to customize the menus to your liking.
On the Menus tab, you can increase the Menu Button Spacing. This value determines the vertical space, measured in pixels, between left-hand menu buttons. You can increase this value to 'spread out' the buttons to make better use of the available menu area.
You can increase the Menu Button width. This value determines the additional width, measured in pixels, to increase the left-hand menu width by. Setting this value to 64 should add a little more than 1/4" to the menu on your tablet's display.
You can hide the function key indicators that normally appear next to the left-hand menu buttons. In the Function Key Indicators section, check Hide Function Key Indicators to remove the F1 through S0 labels.
Menu_Button_Width.png (19.77 KiB) Viewed 35404 times
In the [MenuBtn] section of DCADWIN.INI you'll find the following corresponding keys which are not accessible through the program interface prior to DataCAD 19.
BTN_SPACING=1
BTN_WIDTH=0
SuppressLabels=0
Menu_Window_Large.jpg (46.64 KiB) Viewed 38699 times
On the Toolbars tab, you can increase the drop-down width of status bars. Setting this value to 64 will increase the width of drop-down elements such as Wall, Door, and Window types, a little more than 1/4" on your tablet's display.
Prior to DataCAD 19, you'll need to modify the the key, DropDownWidth, in the [StatusArea] section.
Drop-down_Width.png (5.25 KiB) Viewed 35404 times
On the Interface tab, Symbol Browser Docked Width allows you to increase the docked width of the Symbol Browser. Unlike Menu Button Width and Drop-down Width however, Docked Width is the total width in pixels. You'll have to use a value above the minimum width to see any effect. So start with a value above 160, like 256.
Prior to DataCAD 19, you'll need to modify the the key, DockWidth, iIn the [SymbolBrowser] section of DCADWIN.INI.
SB Docked Width.png (15.55 KiB) Viewed 35404 times
The last thing you’ll want to do is calibrate DataCAD’s display aspect ratio so that squares and circles appear uniformly square and round. This will also ‘correct’ your display so that a display scale of 1/4" = 1’ - 0" will be true. In other words, you could use an architect’s scale to measure the drawing on your display.
Screen Calibration.jpg (42.91 KiB) Viewed 38699 times
Screen Calibration
- Choose “Program Preferences” from the “Tools” pull-down, and then choose the “Drawing tab.”
- Click on the “Screen Calibration” button. DataCAD displays the test pattern.
- Use a ruler to measure the length of each line on the screen, and then type their values in the fields below. Values may be entered using either decimal inches or millimeters.
Note: Make sure to enter the decimal value for each line, without the label; for example 9-1/4” would be 9.25.
- After you have entered both values, click OK on the “Screen Calibration” window, then OK again on the “Configure DataCAD for Windows” dialog. You have completed the process of calibrating your screen.
The best way to test the calibration is to draw a circle inside a square using coordinate input. Measure the length of the lines as they appear on the screen to confirm accuracy of the screen calibration, and check the display of the circle to ensure that it does not look like an ellipse. It should be noted that the shape of the lines and circle in the test pattern does not change after the screen is calibrated. Calibration only calibrates the drawing area.
Last edited by Mark F. Madura on Sun Dec 11, 2016 2:45 pm, edited 1 time in total.
Reason: Updated for expanded Program Preferences dialog.