Tutorial | Fonts | Hatch Patterns | Line Types | Toolbars
Repeat Statement
The REPEAT statement is another method to control program flow. Just as its name implies a series of statements are repeated until a certain criteria is met. Here is the syntax:

figure 4-14
The REPEAT keyword is used to indicate to the compiler the following <statement(s)> are going to be repeated UNTIL the <boolean_eval> equates to TRUE. Notice the placement of the semi-colons. There is no semi-colon following the REPEAT keyword.
Unlike the WHILE statement the REPEAT statement will always execute at least once. This is because <boolean_eval> is not evaluated until after the <statement(s)> are executed.
REPEAT statements are used for all sorts of purposes. Probably the most likely place to see a REPEAT statement is when you are asking the user to do something and you wish to wait until he does something then evaluate what was done. An example is when you are creating menus and asking the user to press a key. You display the menu buttons and wait until the user selects a key.
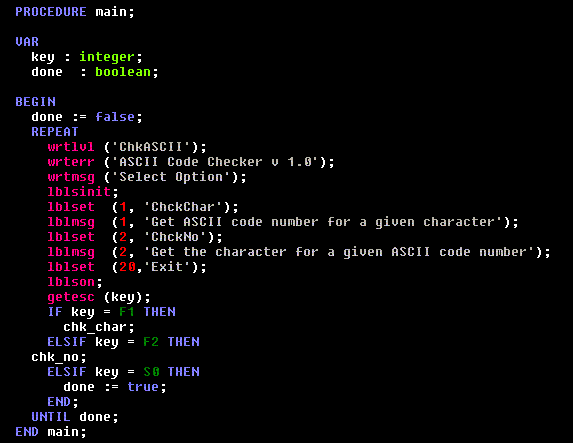
Here is an example from a macro that checks the ASCII value for a key the user presses:

figure 4-15
This is only one procedure from a larger piece of code.
By now you should be familiar with some of what is going on here. You should recognize the IF loop structure towards the end of this procedure. The IF loop along with most of the other code here is nested within a REPEAT loop. As we did in our WHILE example we start by initializing the variable done to FALSE. This way the REPEAT loop will only end if the user does something to cause done to be set to TRUE. Next we display some information using some standard DCAL procedures to write messages. We then setup and display some menu buttons on the lines from LBLSINIT through LBLSET. Then we wait for the user to press a key. This is done with the GETESC procedure. the GETESC procedure limits the user to selecting one of the function keys rather than selecting entities or drawing items. When the user presses a key we have a value stored in the key variable.
The IF loop then checks which key the user pressed and either dispatches the program off to another procedure (CHK_NO or CHK_CHAR) or if the user pressed the S0 key we set done to true. You should recognize the fact that the S0 key is typically the EXIT key in DataCAD. The control falls through to the final UNTIL keyword and done is evaluated. If done is true (which it is only if the user pressed the S0 Exit key) the REPEAT loop ends. If done is still FALSE the loop repeats.
Note that CHK_CHAR and CHK_NO are other procedures that exist in the full source code for this macro but are not shown here. Since they appear before this portion of the code we can call them and execute the code within those procedures from here.
Refer to the DCAL manual for more on WRTLVL, WRTERR, WRTMSG, LBLSINIT, LBLSET, LBLMSG and LBLSON.
This is a pretty typical structure for setting up menus. You will rely on something like this all the time in your programs. On a side note, notice the formatting of the source code listing. It is much clearer to read the code when it is indented as above then if all the code was tight to the left margin. The compiler doesn't care but the people who have to read the code (namely you) will have a much easier time if you follow a system of indentation. Notice how the REPEAT aligns with the UNTIL. See the same alignment with regards to the IF, ELSIF and END keywords. All of these keywords align to help us follow the flow of the program and to see that we don't omit a critical keyword. This may not seem like such a big deal with only 1 or 2 nested statements but imagine sorting through IF loops nested 6, 7, or 8 levels deep.
Trust me it is easy to forget which END goes with which IF. I indent each line 2 spaces you may prefer to use 3 or 4. This is not important as long as you develop a system and stick to it.
Summary
At this point in the tutorial we have covered most of the basics. In the next lesson, Procedures and Functions, we will begin to put it all together and write 'real' macros. You should now be able to browse through much of the sample macros and understand what is going on.
An important thing to do while learning DCAL is to flip through the DCAL manual to learn the procedures and functions available. Chances are there is a routine available to do a task you are thinking about. Reading the manual is dry reading but it will be necessary to learn the routines built-in to DCAL in order to become a competent programmer. Don't attempt to read the manual in one sitting. Doing so will most certainly cause sleep. Keep the manual on hand for when you need to kill 10 minutes. While learning you will need to continually refer to the manual. So even if you don't remember how to use a certain function it will be nice to remember that a function you need exists and where you can find it.
End of Lesson 4 -- Program
Flow Control
< Previous Lesson | Next
Lesson >
DCAL Tutorial Contents
Thank you for printing this page. Please feel free to contact us for further assistance. You can call our sales department at +1 (800) 394-2231, Monday through Friday from 8:00 a.m. to 5:00 p.m. Eastern time or send an e-mail message to info@datacad.com.